

Ikea Design Tool White Shows Up Grey

I'm so excited to share our IKEA Kitchen Reno with you!
From beginning to end, this was an 8-week labor of love that my husband and I did together, and I'm spilling all the details in this post!
IKEA Kitchen Planning
Our IKEA Kitchen Reno began by taking a serious evaluation of the original kitchen and determining what changes were necessary in helping our lives run more smoothly.
Good planning is essential to a good outcome!
The lack of cupboard and storage space in the kitchen was one of the first things we noticed about our house when we bought it two years ago.
For the elderly lady who lived here previously, the kitchen was ideal, but despite our minimalist bent, it's a challenge for our family of seven (now 8!) to find a place for everything.

Our kitchen truly is the heart of our home.
More than just the place where food is prepared, it also serves as our dining room and homeschool room.
We eat here, talk here, play here, and study here. We decided to renovate the most used room in our house this year by designing a homeschool-friendly kitchen on a budget.
The main goal for our new kitchen was functionality. Aesthetics are important too, but our biggest objective was to squeeze the most use out of our space!
To do this, we've settled on a few features:
- tall cabinets (40″)
- 2 pantries
- no glass doors or open shelving (I love the look of open shelving, but it would cut down greatly on our storage space. Glass doors are pretty, too, but they're also more expensive and can look cluttered if they're not styled properly.)
- a built-in desk
- cabinets for school books
Why an IKEA Kitchen?
A few months ago, I found a used kitchen on Kijiji that appeared to be ideal for our space for $1200. It came with a new, stainless steel 36″ double door refrigerator with a bottom drawer freezer, 2 stoves, and a dishwasher. I knew the refrigerator alone was worth well over $1200, so even if the cabinets didn't pan out, we still would've scored big time. The tall, shaker-style cabinets were right up my alley, but they were stained a light brown with a pink undertone, so our plan was to get them refinished in white (I adore white and grey kitchens alike, but our kitchen is too dark to handle grey cabinets).
I sold the two stoves, the dishwasher, and an unused fridge in our garage for $450. We consulted with a cabinet maker who priced out the cost of refinishing the cabinets. It was 3x more than I expected, and he told us that the cabinets only had 5 years of life left in them. It was simply not worth it. I re-listed the cabinets on Kijiji and they sold within a few days for $1100. We kept the refrigerator, which essentially ended up being free after the sale of the cabinets and the other appliances!
I went back to the drawing board and researched (read: scoured the Internet for inspiration and visited all of the custom cabinet builders in our town) different ways to achieve a simple, affordable, quality farmhouse-inspired kitchen with a touch of elegance that suited the style of our house.
We concluded that an IKEA kitchen would be the best option for us. Their price was unbeatable. The cost of a brand new IKEA kitchen was less than the price we were quoted to refinish and install the used cabinets I had originally bought off Kijiji!
After talking to other friends and family and touring their IKEA kitchens, I was convinced the quality would stand up to heavy use by our tribe of seven, too.
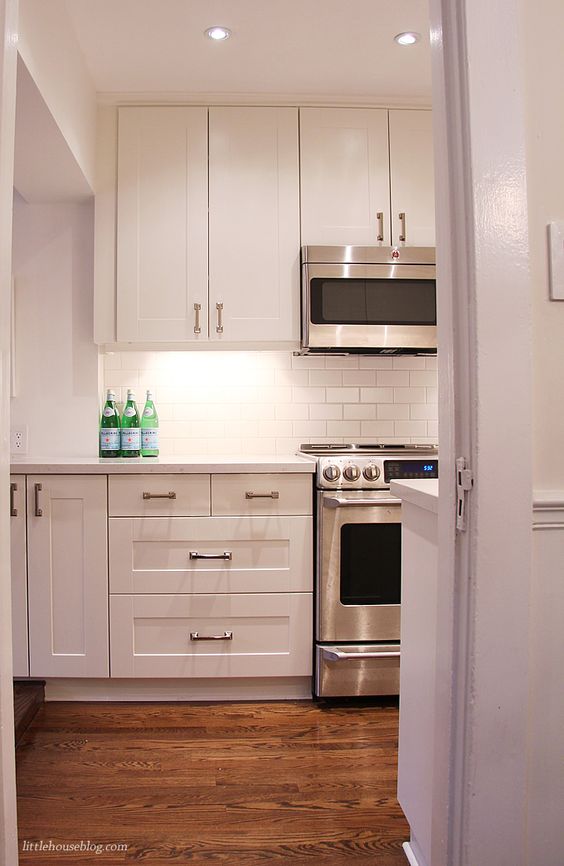
IKEA Grimslov Kitchen Inspiration Pictures
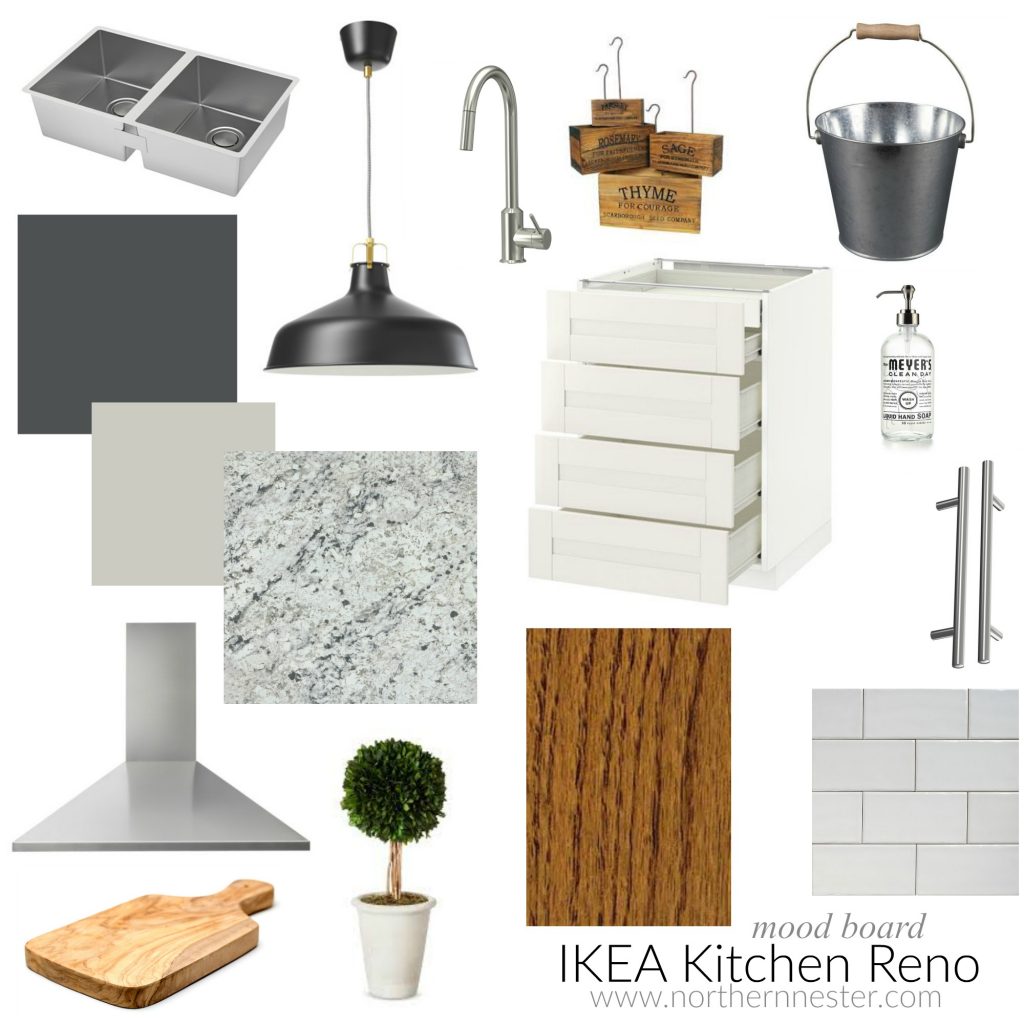
Aesthetically, I had a couple dreams for our new IKEA kitchen. My wish list included:
- white GRIMSLOV cabinets (Luckily for me, they are one of IKEA's most affordable options per linear foot! I really wanted pure white cabinets, but GRIMSLOV 's shaker style doors only come in off-white. With the right counter top, wall paint, and backsplash, I think it will still be bright and beautiful! Plus, off-white shows dirt less, right? :) )
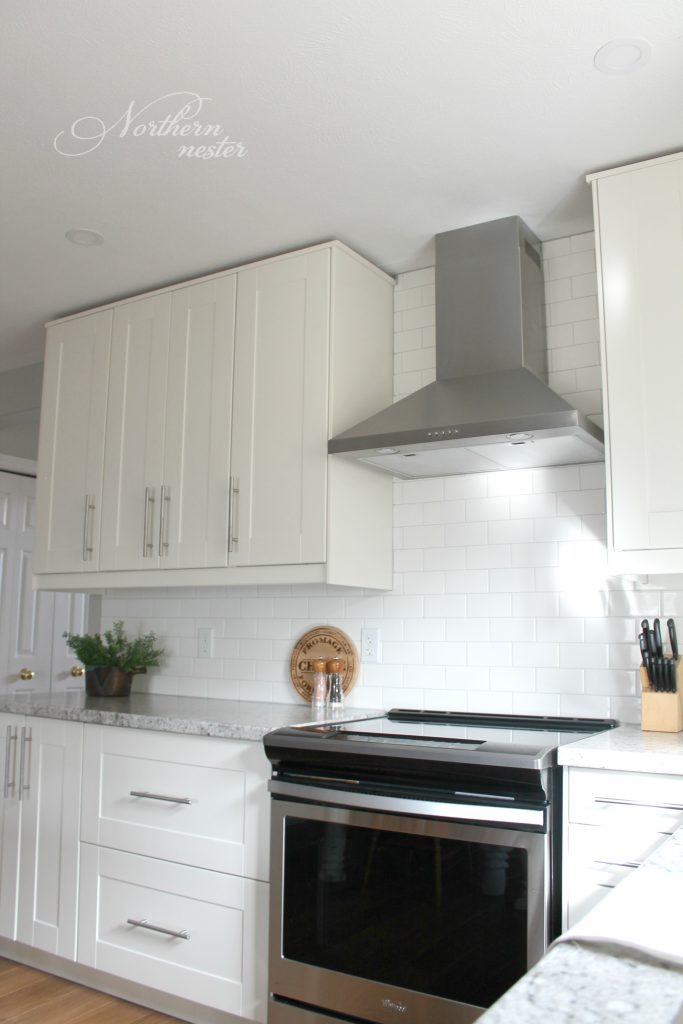
- a chimney style range exhaust hood
- brushed nickel door and drawer pulls
- subway tile back splash
- granite-look laminate counters, or solid surface in a medium grey color/pattern
How To Use IKEA's Kitchen Planning Tool
After taking our kitchen measurements (a boring, but essential step), I spent a few days designing our kitchen on IKEA's handy kitchen planner tool. IKEA was on top of their game when they launched this thing (which now allows you to design your own office, bathrooms, and closets too!).
With a keyboard and mouse, you can have a realistic picture of what your future kitchen will look like without even visiting the store.
The IKEA kitchen planner features a floor view and a 3D view. You can zoom in and pan out; add, delete, and open up all the different cabinet, drawer, and pantry configurations; change the door fronts for a different look; move cabinets and appliances around; add furniture; select different handles, knobs, pulls, faucets, and sinks; add counter tops and crown mold, and even choose your wall and floor colors!
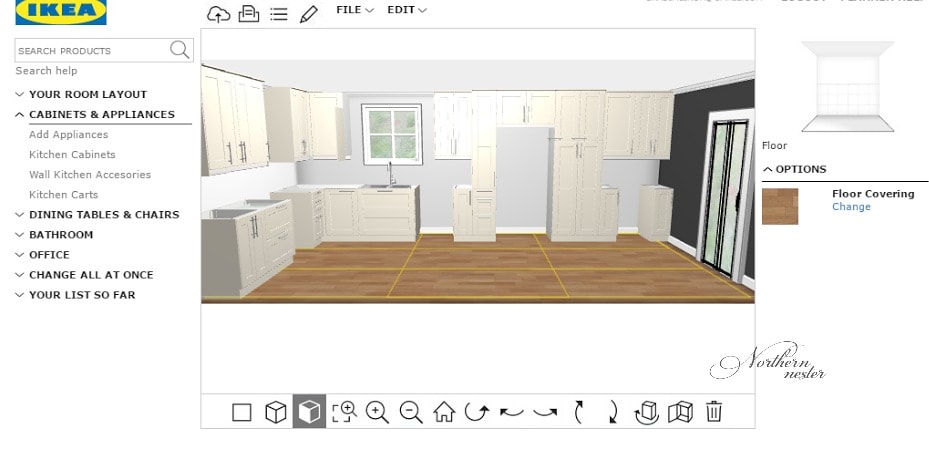
Proposed new kitchen layout via IKEA's Kitchen Planner
There are a few things to be aware of if you use IKEA's kitchen planning tool to design your own kitchen:
- Disable any ad-blockers for IKEA's webpage. I was getting frustrated about not being able to set up an account (which is free, but necessary in order to use the planning tool), until my husband disabled the ad-blocker for the IKEA webpage. The planning tool worked like a charm after that.
- Measure, measure, measure, and be sure to add any permanent fixtures such as windows and doors to your plan.
- Be aware that your ceiling height must be at least 96″ in order for the IKEA's taller 40″ cabinets to work. This is standard for newer homes, but double check, just in case!
- Take into account any plumbing or electrical changes. The plumbing for our kitchen renovation is staying the same, but we will need an electrician to hard wire the under counter lighting, the exhaust, and the new lights above the table.
- The software can be a little glitch-y at times, so it's important to save your work as you go. (Did you notice the misplaced cover panel next to the window in the drawing above? That was one of the issues the planner couldn't resolve for me!)
- Keep the "Work Triangle" in mind as you plan your layout. You want your fridge, stove, and sink to be close enough to each other that you're not wasting steps between them.
- Change things up to see how they look. I changed my mind about a few things after seeing how everything looked put together. Play around before you buy so you don't have any regrets later!
- Make use of the open cabinet feature. This allows you to see what's behind your cabinet doors so you can plan your kitchen with maximum efficiency and functionality.
- Don't forget to add cover panels to your design. You'll want these on the sides of any cabinets that are exposed to the eye to cover the frames.
Initially, I thought I wanted black knobs for our doors and black pulls for our drawers, but realized it looked too heavy for the cabinets. I eventually settled for much sleeker, matching LANSA handles of the same size for all the cabinets and drawers (pictured above). They feel classier and more cohesive to me.
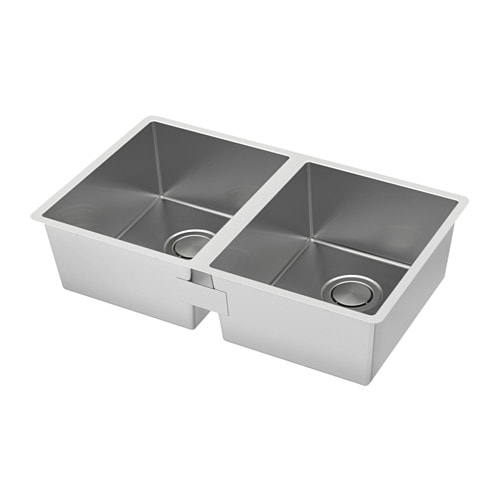
I also changed our sink selection at the last minute. Instead of the pure white DOMSJO double-bowl apron sink, which I thought clashed too much with the off-white cabinets, we chose the stainless steel NORRSJÖN sink. It can be top-mounted or under-mounted.
IKEA Countertops
After touring IKEA's kitchens, we decided to pass on their laminate counter tops.
I really loved the look of their grey stone and white marble laminates, but one stretch of counter top will be over 10 feet long, and IKEA's largest laminate slab is 98 inches. This means that we would have a seam somewhere in the stretch that would be near the sink or over the dishwasher, which can cause major moisture induced problems later on.
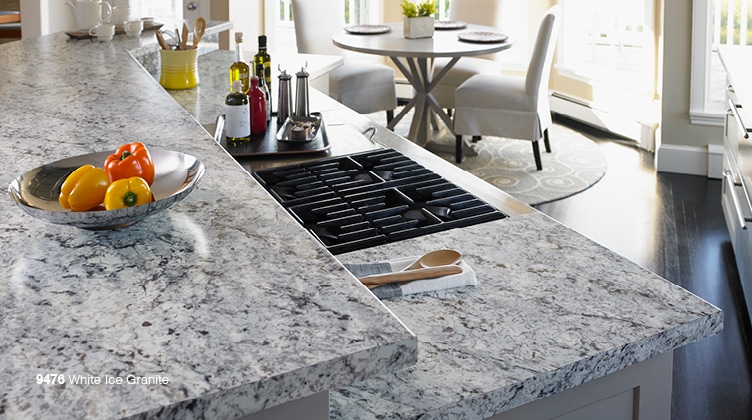
White Ice Granite laminate counter top via Formica
We settled on Formica's Argento Romano laminate. Real granite is not in the budget, but laminates have come a long way and the White Ice Granite or Argento Romano laminate looks incredibly close to the real deal!
Best Backsplash for IKEA Kitchen
I was torn between a light grey subway tile backsplash with white grout, or white subway tile with a light grey grout.
I like the depth grey adds to white kitchens, but I feel grey tile is a fad that will be over long before white tile is. I planned to paint the main walls a very light grey paint, and the accent wall by the patio doors a wonderful charcoal paint called (Cracked Pepper by Behr). Paint is easier and less expensive to change.
Subway Tiles That Match IKEA Grimslov Cabinets
White subway tile appeals to me because it's timeless, bright, and has a definite farmhouse feel about it. The trick is finding an off-white tile that will work with the GRIMSLOV cabinets. Pure white tile would make the off-white cabinets look grungy.
After searching online, I discovered Home Depot has an off-white 3×6 tile by Daltile that's almost an exact match to our kitchen cabinets! I took a cabinet door to the store with me last week to make sure, and was thrilled to discover that these perfectly matching tiles were on sale!
IKEA Kitchen Lighting
For the lighting in our kitchen, we settled on IKEA's hardwired under cabinet lighting by UTRUSTA.We currently have recessed lighting over our sink that will be staying, and I'm still deciding on which pendant lights to put over our farmhouse table. It's a toss up between IKEA's RANARP or ALVANGEN pendants:
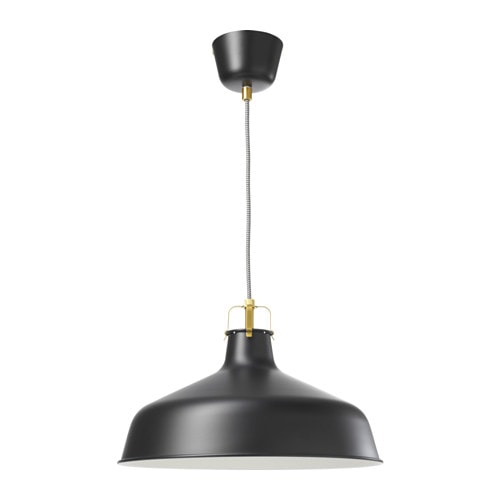

or, these pendant lights I found on Amazon:


For the wall color in our kitchen, I was leaning towards Sherwin Williams' Repose Gray, but since Behr paint is my favorite, we checked out Home Depot to see if they carried a similar color. My 7 year-old found nearly identical match: Dolphin Fin.

Dolphin Fin will be our new main floor color. It's a gorgeous gray that has just enough of a greenish brown undertone to keep it from feeling cold.

For a depth and drama, I planned to paint the accent wall (where the patio doors are located) and possibly the walls behind the cabinets Cracked Pepper by Behr.
I think it will make the cabinets pop. Miss Mustard Seed did this in her kitchen and I love how it adds a bit of contemporary moodiness without detracting from the farmhouse feel.
While my type of farmhouse style has evolved over the years, I've always loved the country look. Even as a little girl, I decorated my side of the bedroom (my poor sister) with twinkly lights, tin pails, and anything wooden or rustic. I've saved several farmhouse pieces, similar to the ones below, and can't way to display them in our new kitchen!


IKEA Kitchen Ordering & Delivery
After I finished designing our IKEA kitchen, we decided to make the trip to our nearest IKEA (a 40 minute drive) and order at the store instead of online.
I am so glad we did!
We bought our kitchen cabinets during IKEA's Kitchen Event, which resulted in the kitchen department being insanely busy. We happened to arrive half an hour before the store officially opened, so we were third in line. By the time we had placed finished ordering, the line-up of people waiting to talk with a kitchen staff member was longer than the whole department!
I highly recommend arriving well ahead of time if you plan on ordering your kitchen at the store during their sale. We received 10% back in IKEA gift cards which easily covered the cost of our back-ordered sink, and light fixtures.
When we got to the store, we looked over our selections on display in the kitchen department before ordering. I wanted to make sure everything looked as good in person as it did online.
This is where we made the decision not to use IKEA's laminate counter tops. The largest slab of laminate was 8 feet long, and we needed a piece that was over 10 feet. In addition to very obvious seams, IKEA's laminate counter tops looked more plastic-like to me than the Formica samples I had seen at Home Depot, so we nixed the idea completely.
Everything else was just how I imagined; better, actually, because the GRIMSLOV cabinets looked more white than off-white!
Suggestions from IKEA's Kitchen Department
A member of IKEA's kitchen staff, Maureen, looked over our design online with us, confirming measurements and placements, and made several great suggestions, one of which was purchasingan extra set of shelves for each 40 in. upper cabinet that we had two or more of in the same size.
Shelves are sold in packages of two, which we had included for each cabinet, but it turns out that 40 in. cabinets can fit 3 shelves very nicely. We had four, 24X40″ upper cabinets in our kitchen design, so we bought two more packages of shelves which gave us enough for 3 shelves in each cabinet.

Pay for delivery!
Maureen also convinced us to pay for delivery rather than picking up the cabinets ourselves and we are SO glad we did!
If you're ordering a kitchen, do yourself a favor and pay the $75 to have your kitchen delivered to your house. IKEA takes care of picking out all the boxes from the warehouse, loading them onto the truck, delivering it to your house (which was a 40 minute trip for us), and unloading everything when they get there.
If anything is damaged or missing, they will deliver the replacements for free within 4 days. Our only complaint about IKEA's delivery service is that the driver cursed an awful lot in front of our kids (which he thought we had too many of, ha!), even after my husband asked him to stop swearing.
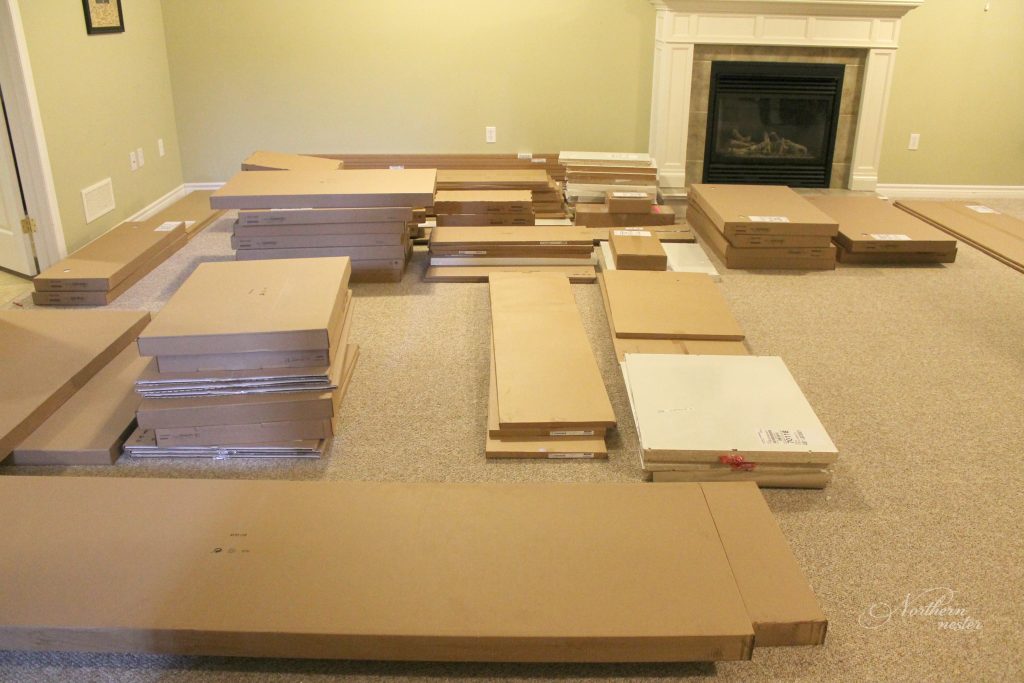
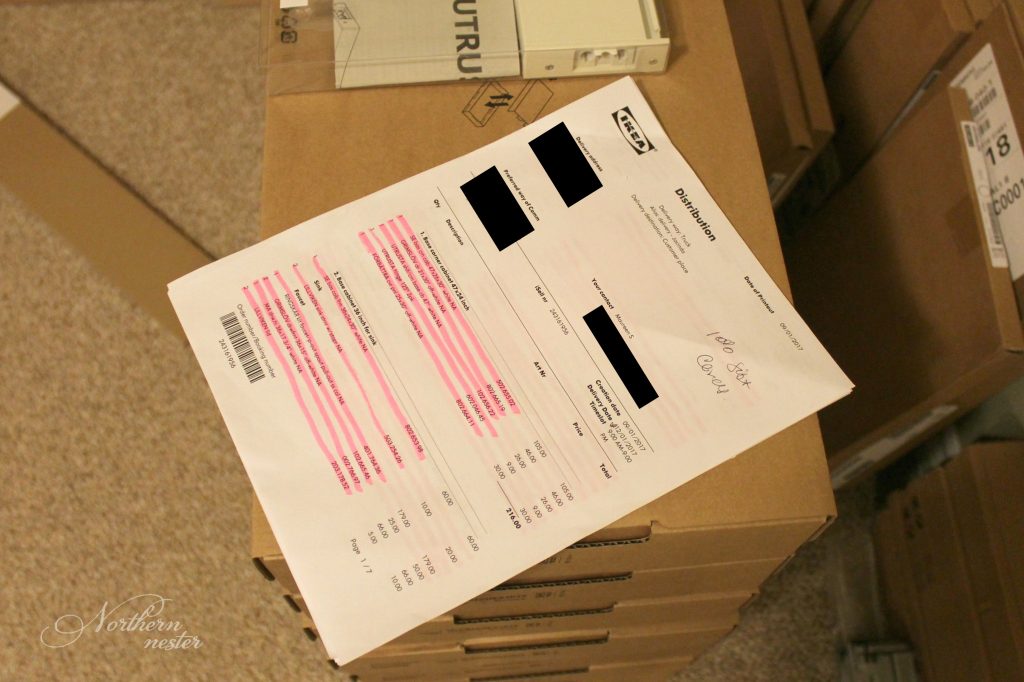
Taking Inventory Of IKEA's Kitchen Delivery the efficient way
Taking inventory was the first thing we did after the mountain of boxes arrived. We had 4 days to let IKEA know if anything missing or damaged if we were to receive free replacements and delivery. I started doing the job by myself, but was overwhelmed but the magnitude of everything that needed to be checked!
It didn't help that our itemized sheet was sectioned by all the different parts needed to build each cabinet, rather than listing each item in alphabetical or numerical order. Brad stepped in to help me out and we quickly learned the most efficient way to go through the list.
First, we grouped like with like.
Doors and cabinets of the same size were stacked on top of each other, bags of matching hinges were grouped together, suspension rails and toe kicks were stacked together, sink components were set aside in a corner, etc.
Then, Brad counted how many of each box or bag was in a group and I used a highlighter to mark them off our list. Everything but two back-ordered items was there, and only one door was warped (which we found out about after it was hung), so we could get started on our kitchen as soon as we were ready!
How long does it take to build an IKEA kitchen?
8 weeks, we found out.
Between the 2 of us, working mostly at nights and on Saturdays, it took us 8 weeks to rip out our old kitchen and put together our new one. This included everything from building the Sektion boxes, installing the cupboards, doors, and hardware, installing the new appliances, light fixtures, and counter tops, and tiling our backsplash (a first time experience for both of us!).
It felt like a long haul while we were in the middle of the chaos, but now that it's finished, I'm so thrilled we plowed through the challenges of doing a kitchen reno with 5 kids under foot!
This was the part where I seriously second guessed our decision to renovate the kitchen!
Most of the kitchen renovation went very smoothly. Brad fell off the ladder during the install of the upper cabinets at one point and busted a hole through the drywall on his fall down, but thankfully, that was the only catastrophe, and no bones were broken!
IKEA Kitchen Reno Pictures: Before & After!

I legit happy danced when the last kick plate was snapped into place! Words cannot describe how happy I was to have a have a stove after 8 weeks of "cooking" for 7 without one!
(By "cooking," I mean we ate prepackaged carbs that tasted similarly to the boxes the came in.)
It's an overcast day, so these photos aren't great, but I thought I'd share a few shots anyway.
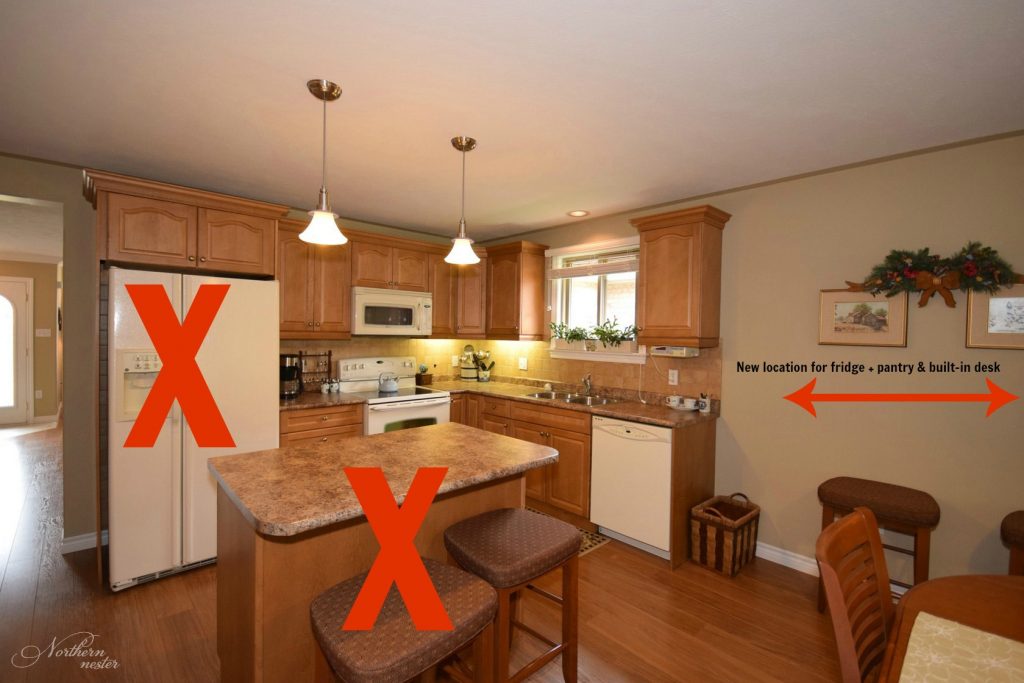
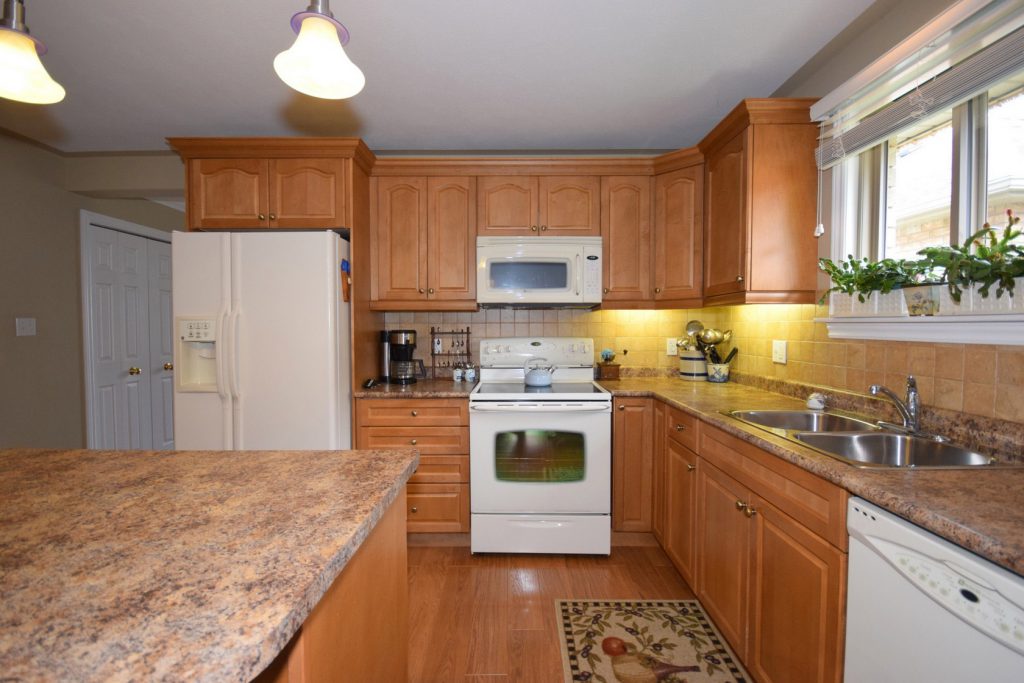
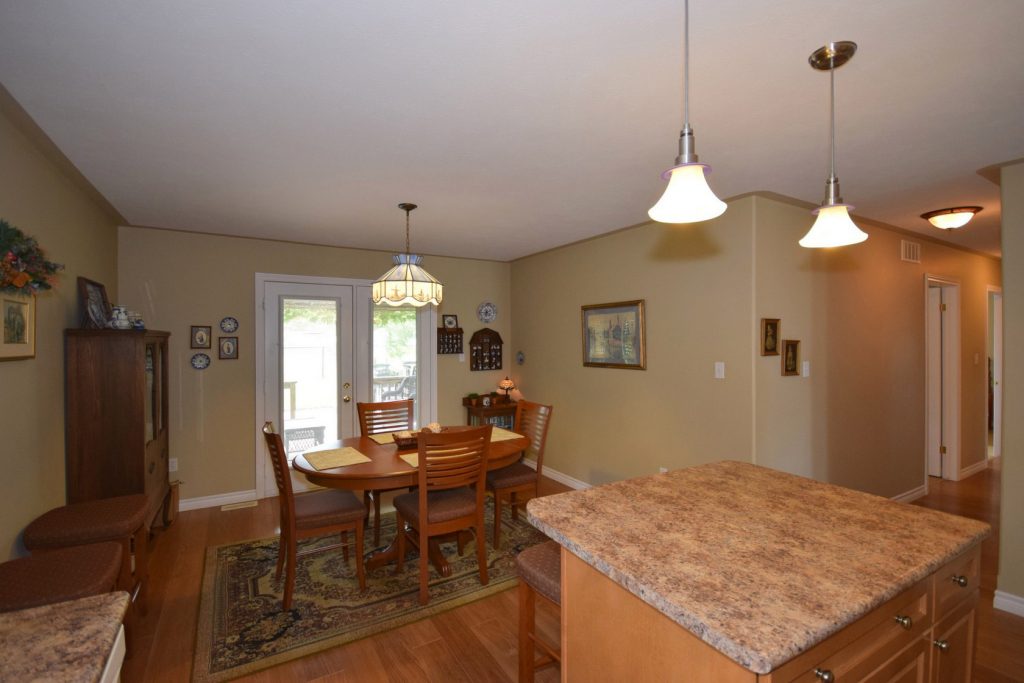
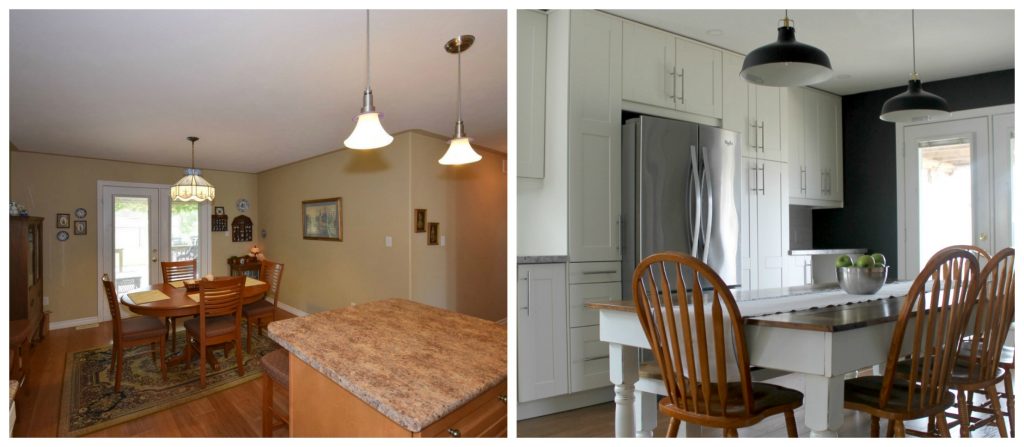
Here's a photo of our old kitchen from the MLS listing when we bought our house two years ago:
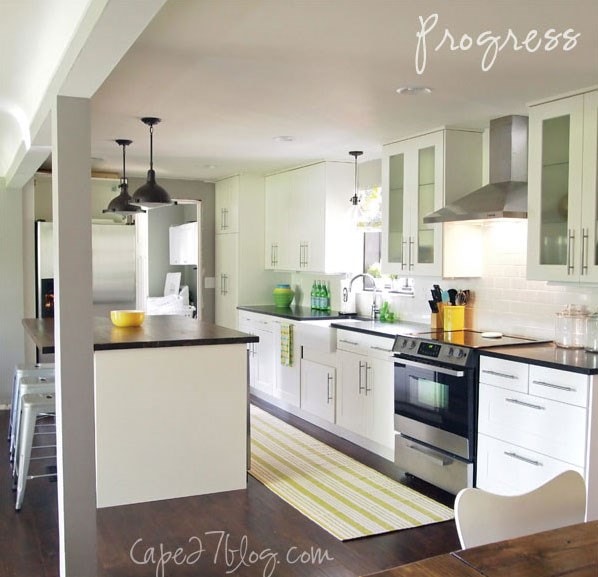
This is our kitchen now!
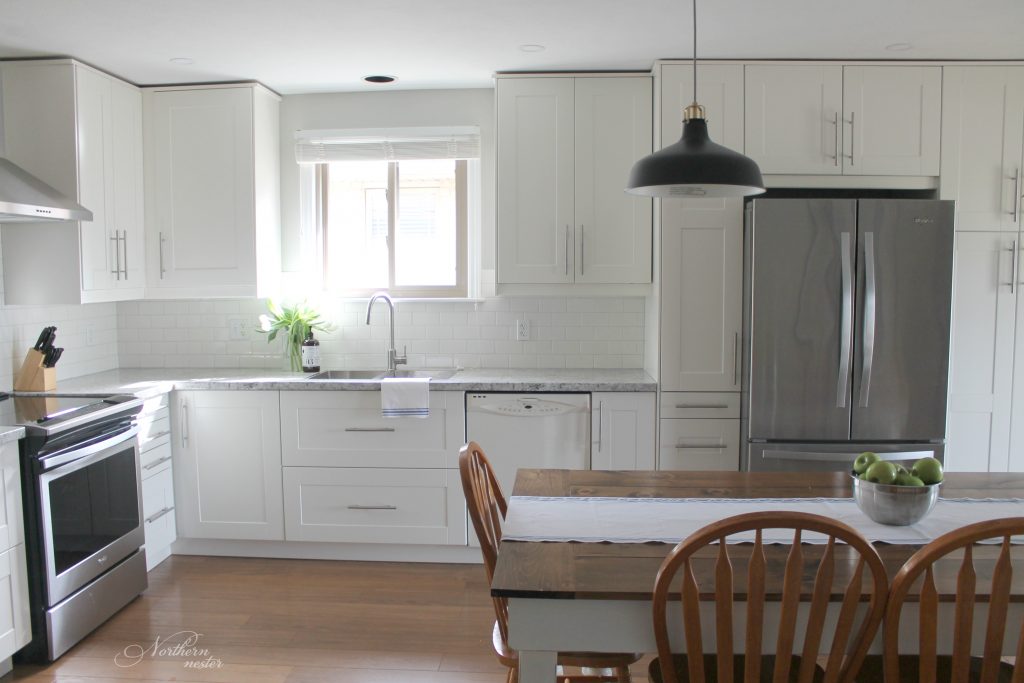
Everyone asks where our microwave is….we hid it in the cabinet above the dishwasher!
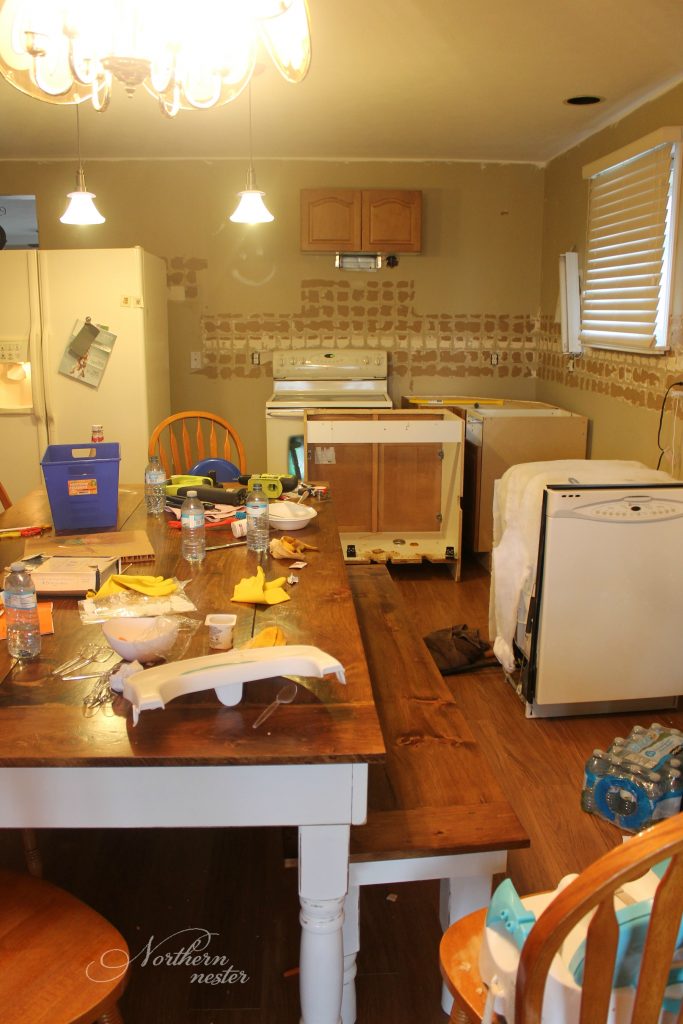
Another before:
Same spot, after:
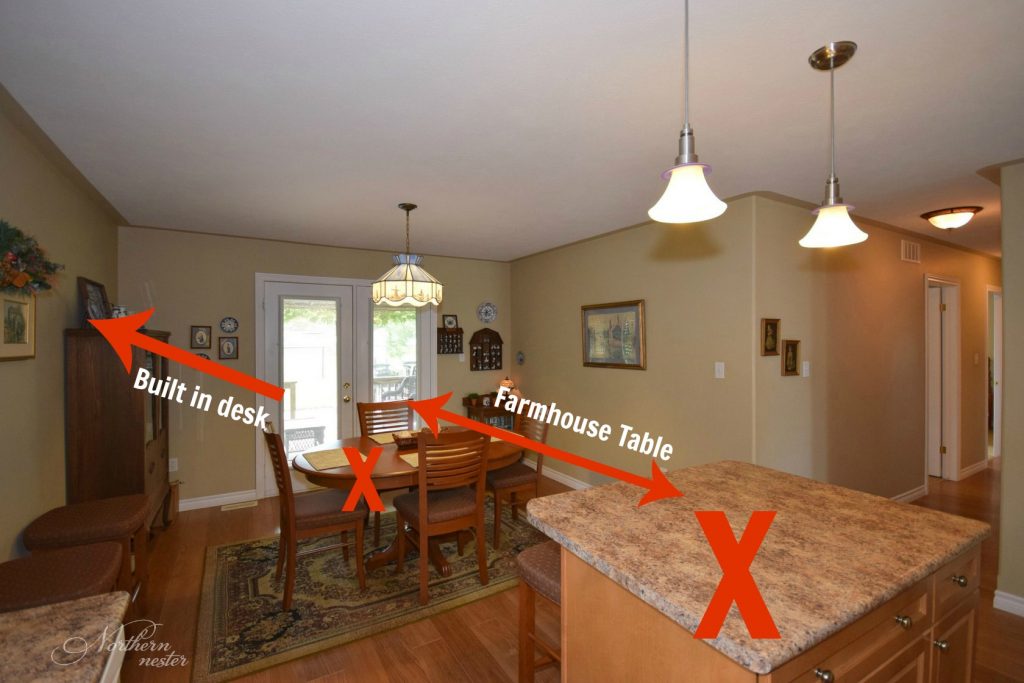
A before photo of the dining area:
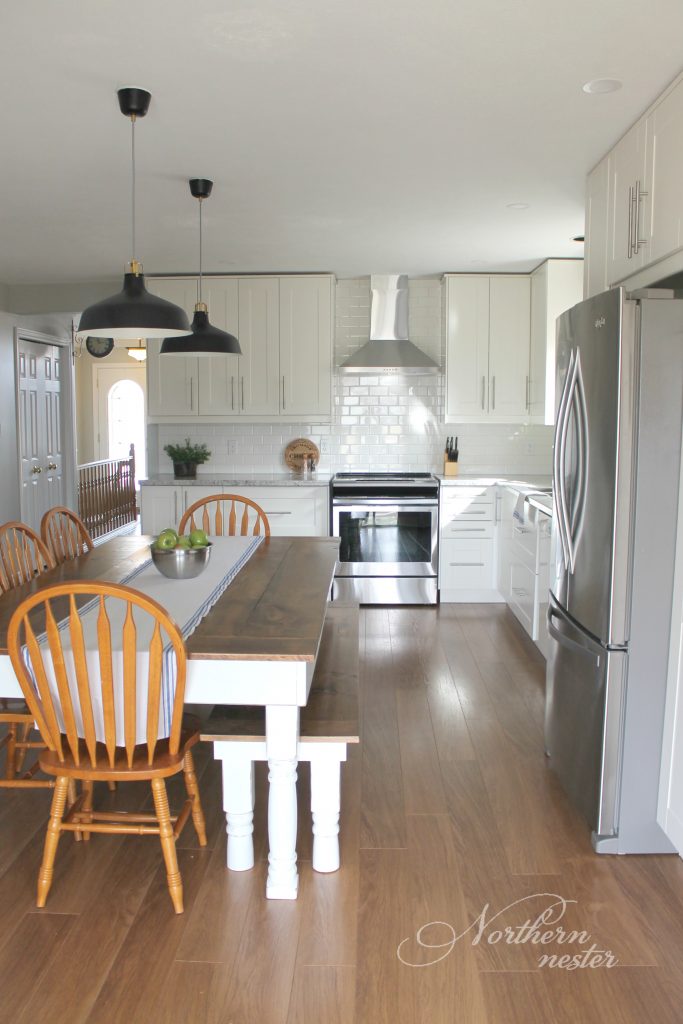
And how it looks now:
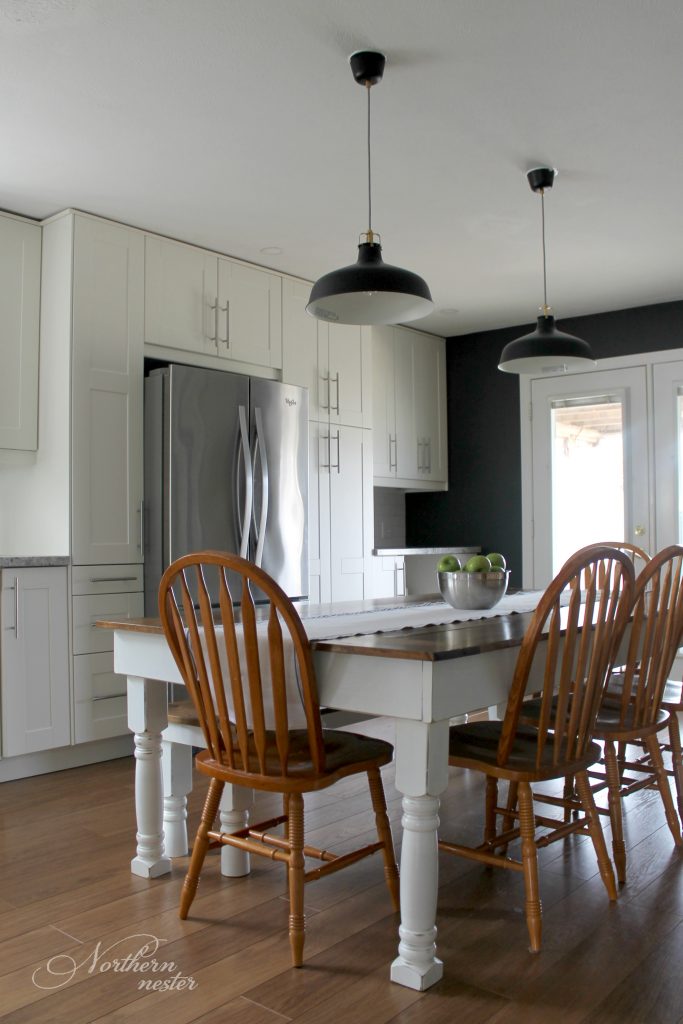
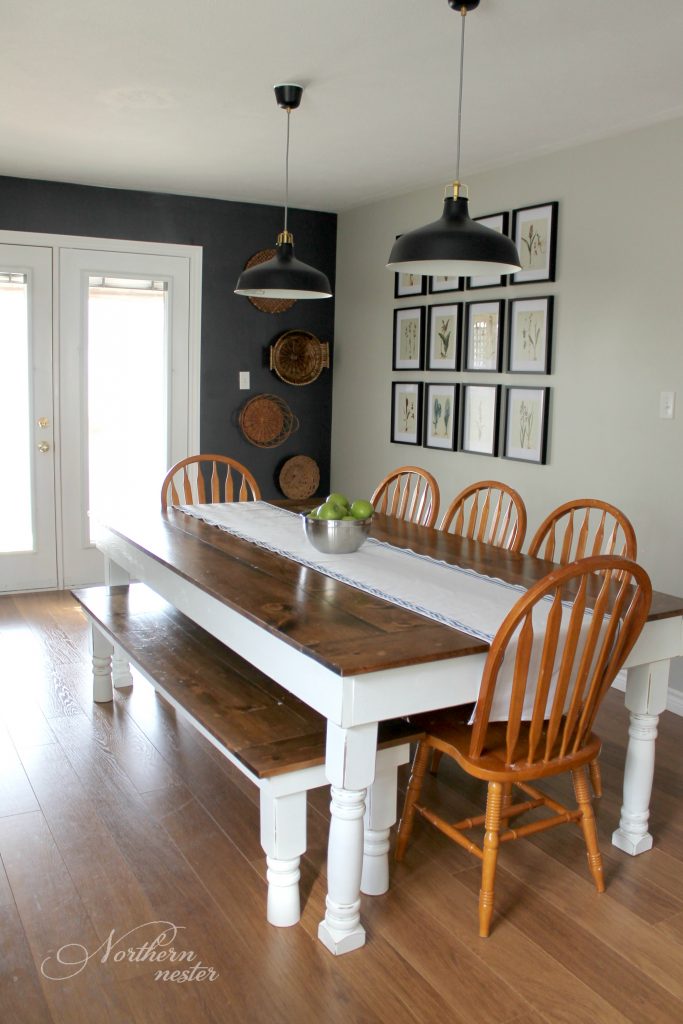
Removing the island resulted in a much better flow of traffic for our family of seven.
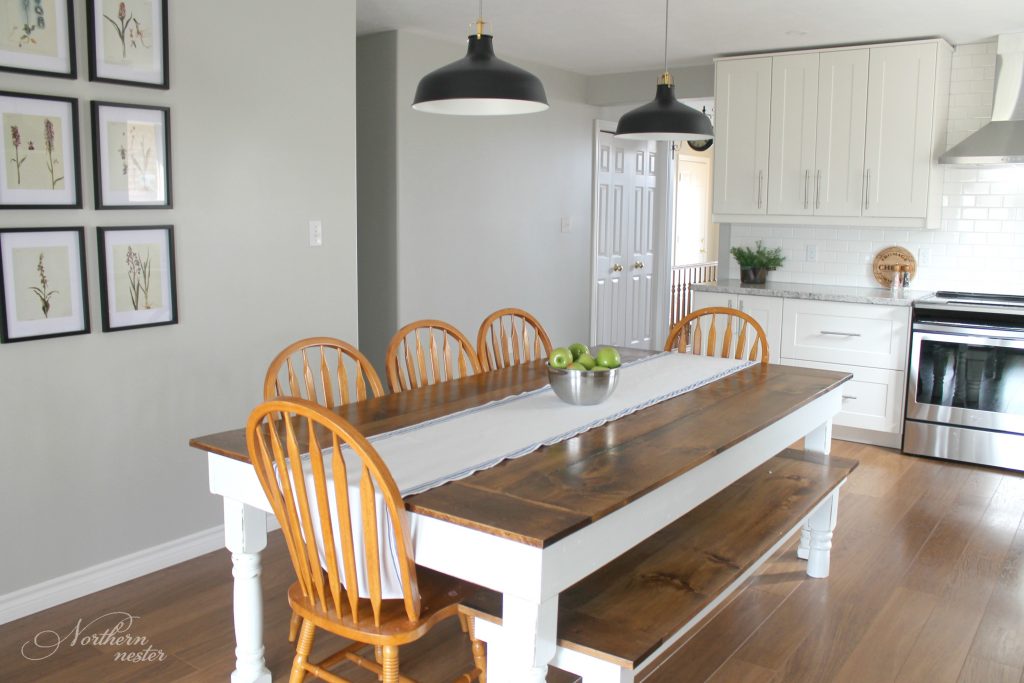
We also built our Farmhouse Table, and Brad drew up the plans, which you can find here.
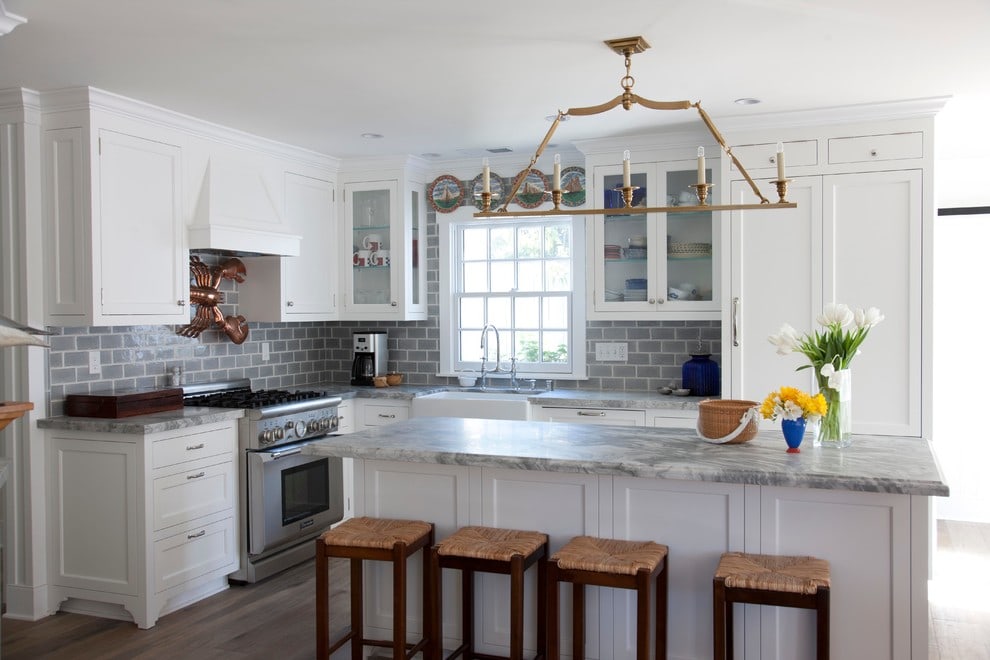
The kitchen is so much brighter, even on this rainy day, thanks to IKEA's white Grimslov cabinets, shiny white subway tile, under cabinet lighting, and new, recessed lights.
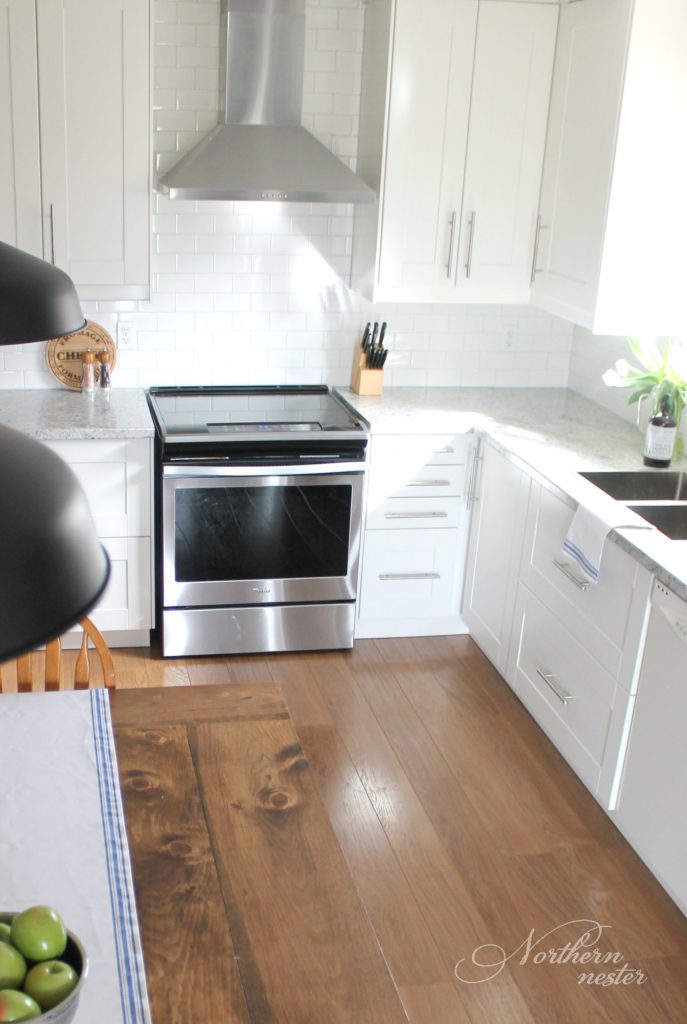
We chose Formica's Argento Romano laminate counter tops because of their affordability, but everyone asks if they're granite!
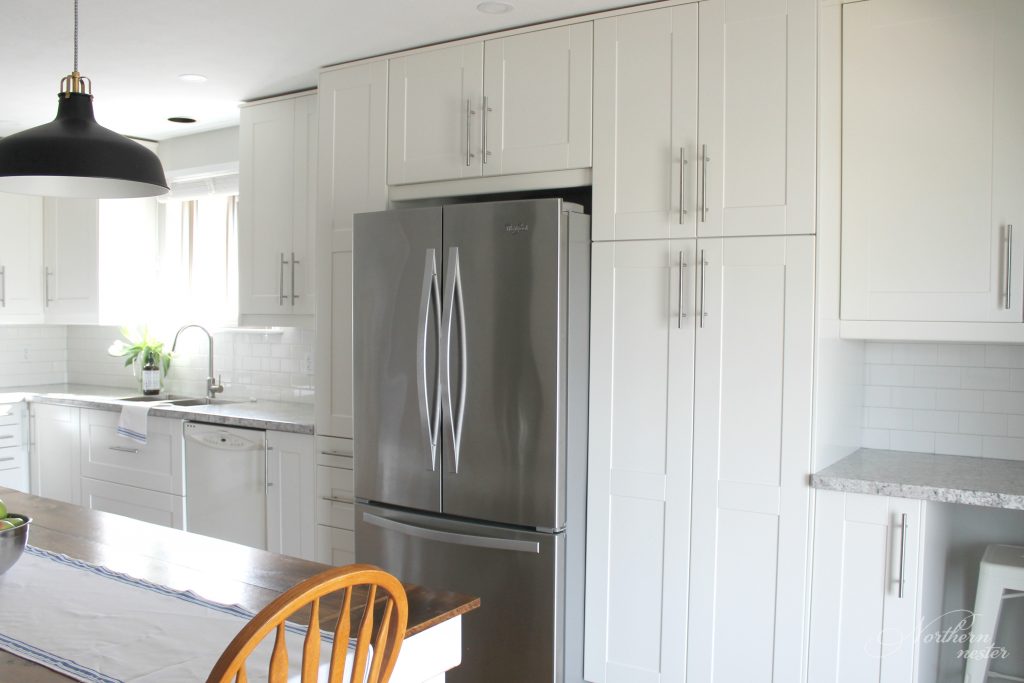
The addition of two pantries and a built in desk provide more than enough storage for food and all our homeschooling books.
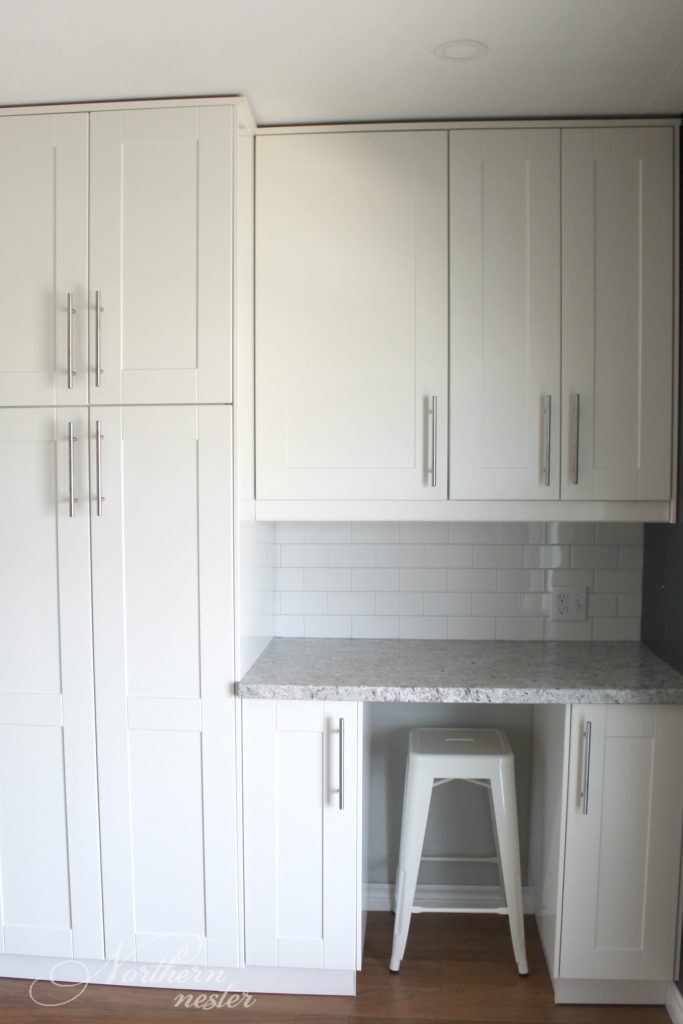
The kids love to do their schoolwork here, and when they're not using it, it makes a wonderful command station for me!
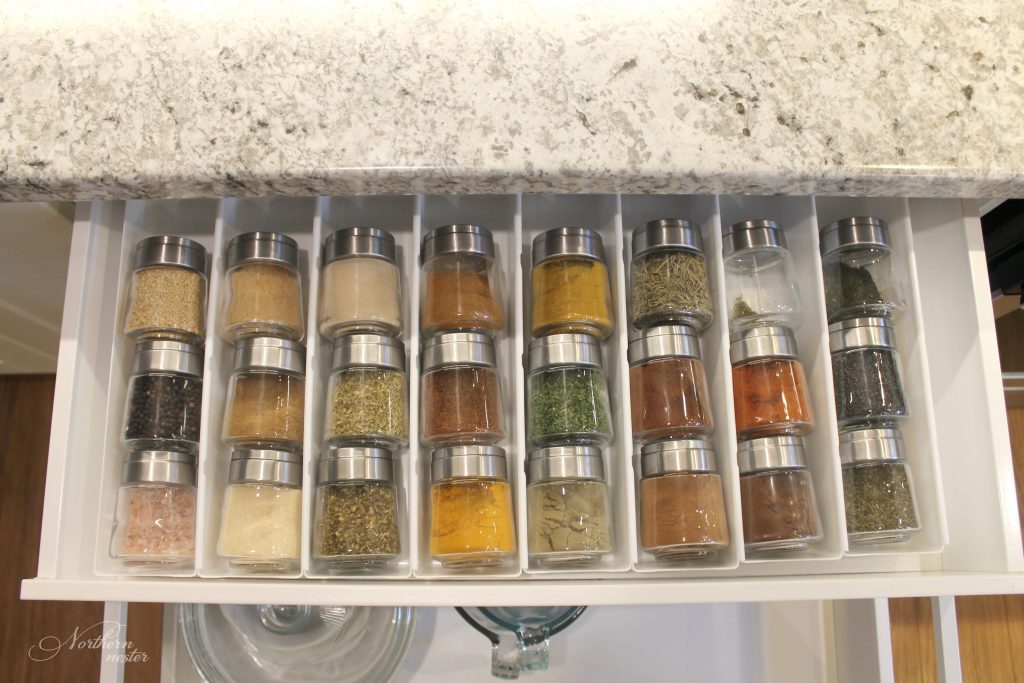
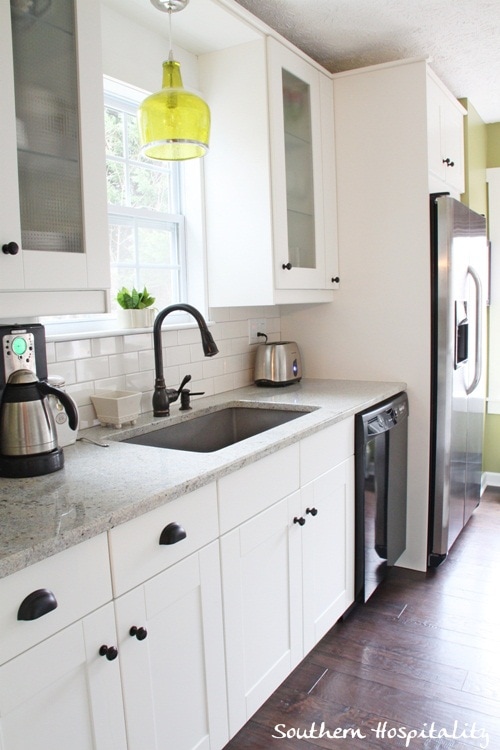
This invisible spice drawer in our double bank of drawers next to the stove is one of my favorite features. I love seeing my most-used spices at a glance and knowing how much of everything I have left.
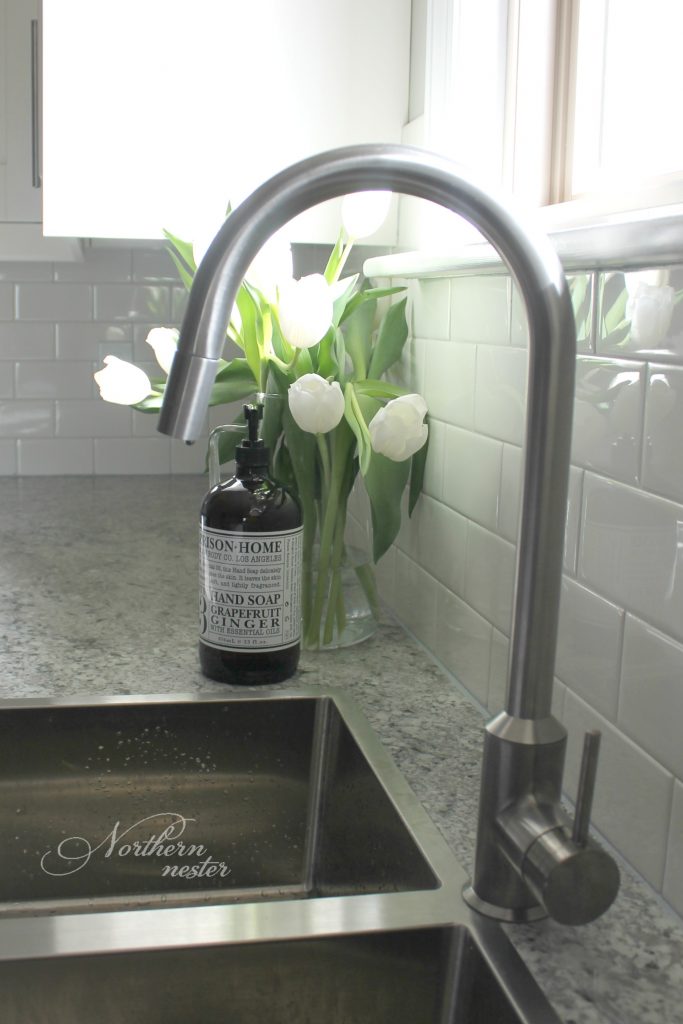
Originally, I had envisioned an undermount sink, but since they aren't yet compatible with laminate counters, we opted for IKEA's NORRSJON stainless steel double bowl, top mount sink that sits almost flush with the counter. We're loving our IKEA Kitchen Sink!
We also chose IKEA's RINGSKAR faucet. It's a super simple, sleek design with a pull-out sprayer. It's quite high, which makes it really nice for filling up large stock pots.
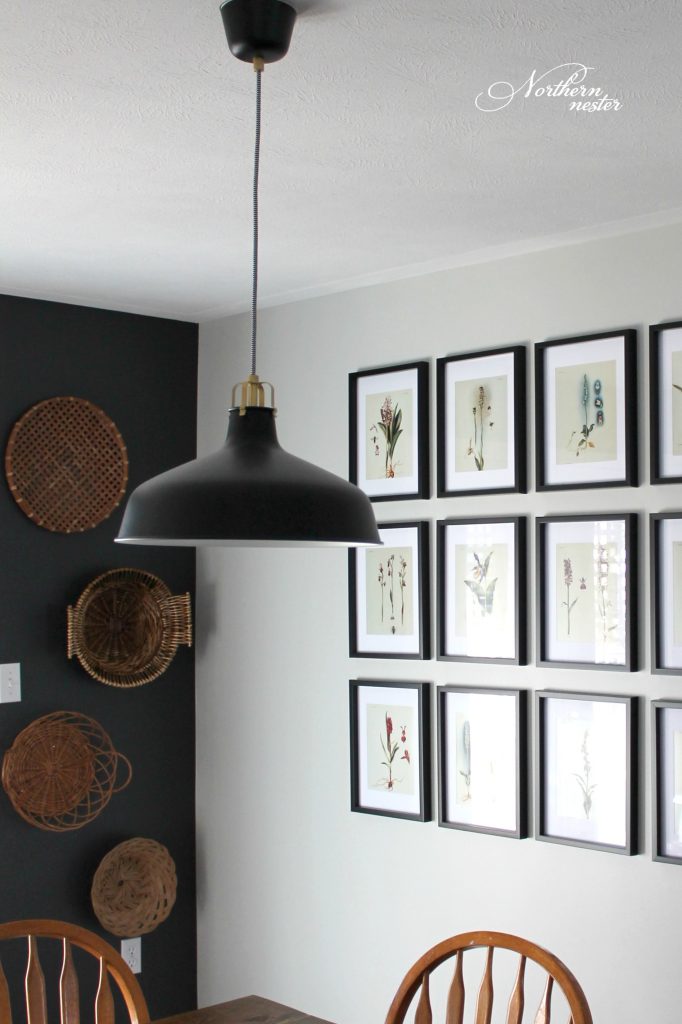
You can see more of this art gallery wall on the other side of the table here.
A few side by side before & afters:


Ikea Design Tool White Shows Up Grey
Source: https://northernnester.com/ikea-kitchen-reno/
Posted by: whitesains1990.blogspot.com
0 Response to "Ikea Design Tool White Shows Up Grey"
Post a Comment